Your cart is currently empty!
Unmask Real Time on Page with Custom Metrics (GA4 & GTM)
Table of Contents
- Understanding Time on Page Metrics
- Benefits of a Custom Time on Page Metric
- Our Approach: Implementing Custom Time on Page Tracking
- How to Access and Analyze the Custom Time on Page Data in Google Analytics
- Final Words
- Frequently Asked Questions
- Why is Google Analytics’ default time on page tracking inaccurate?
- How does a custom time on page metric improve accuracy?
- What tools are needed to implement a custom time on page metric?
- Can I use the custom time on page metric in Google Analytics reports?
- What are the benefits of using Google Looker Studio for reporting?
Accurately measuring the time users spend on your webpage is crucial for understanding engagement and optimizing content. In a previous article, we explored how to use time metrics with Google Analytics and Looker Studio. However, we highlighted the inherent inaccuracies in Google’s default time tracking methods. This makes it challenging to rely on this data for critical business decisions.
Understanding Time on Page Metrics
Google Analytics tracks time on page by calculating the difference between the timestamps of two consecutive page views. This method has significant limitations. For instance, it does not account for the time spent on the last page of a session. When a user exits the website or becomes inactive without navigating to another page, the time spent on that final page remains unknown. This can lead to substantial inaccuracies, especially for websites with low page views per session, where the last page view duration is often a critical metric.
To overcome these limitations, implementing a custom time on page metric is the most ideal solution. By using Google Tag Manager in conjunction with Google Analytics, you can achieve more precise tracking, gaining valuable insights into how users interact with your content. This article will guide you through the step-by-step process of setting up a custom time on page metric, ensuring you capture accurate and actionable data.
In this article, we will explore a custom implementation to accurately track the time spent on each page, providing a more reliable metric for user engagement analysis.
Benefits of a Custom Time on Page Metric
Enhanced Accuracy in Measuring User Engagement
Implementing a custom time on page metric allows for precise tracking of the actual time users spend on each page. Unlike the default method in Google Analytics, which misses the duration of the last page view, a custom metric ensures every moment of user interaction is captured. This level of accuracy provides a clearer picture of how users engage with your content, enabling you to identify which pages truly capture their interest.
Improved Insights for Content Optimization
With accurate time on page data, you can better understand which content resonates most with your audience. This information is invaluable for content optimization, allowing you to focus on creating and promoting the types of content that keep users engaged longer. By identifying patterns in user behavior, such as which topics or formats result in extended time on page, you can refine your content strategy to maximize engagement.
Better Data for Making Informed Business Decisions
Reliable metrics are crucial for making informed business decisions. Accurate time on page data can inform various aspects of your business strategy, from marketing campaigns to product development. For example, understanding which pages hold user attention can guide your advertising efforts, ensuring you allocate resources to the most impactful areas. Additionally, this data can support user experience improvements, leading to higher satisfaction and potentially increased conversions.
Our Approach: Implementing Custom Time on Page Tracking
To achieve accurate tracking of time spent on each page, we will implement a custom metric that sends frequent time measurement event parameters. This approach ensures that every moment a user spends on a page is captured, providing a more reliable metric for analysis.
The core of this approach involves sending time measurement events at regular intervals, for example, every 5 seconds. These events will be triggered by a setup configured in Google Tag Manager, ensuring that time spent on the page is continuously recorded.
Step 1: Create a Google Analytics Event
- Log in to Google Tag Manager: Navigate to your Google Tag Manager account.
- Select your Container: Choose the container for the website where you want to implement the custom time on page tracking.
- Create a New Tag: Click on “Tags” in the left-hand menu, then click on “New” to create a new tag.
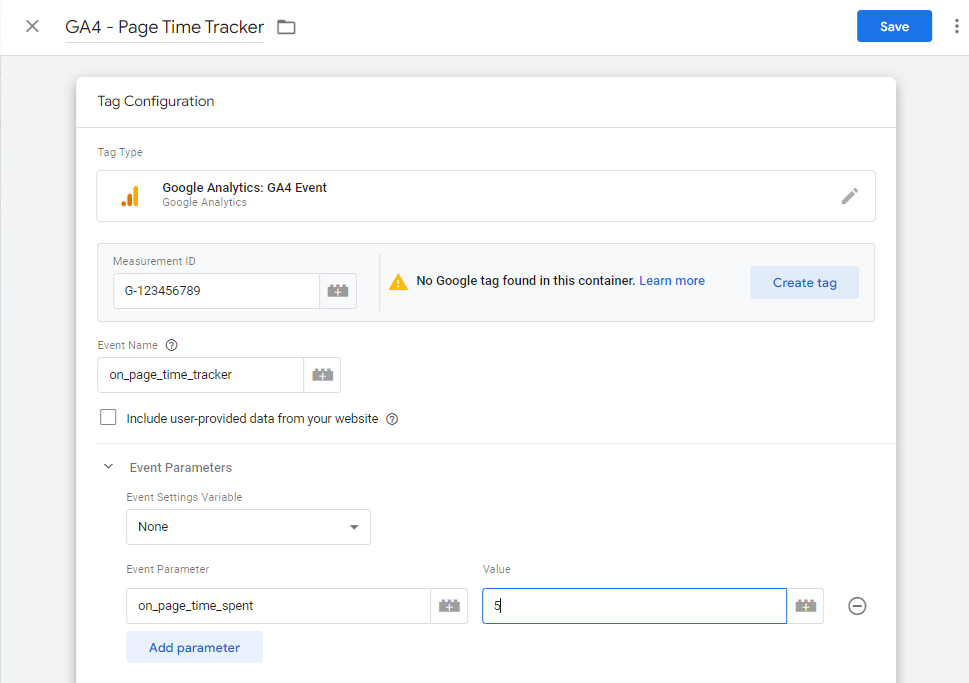
- Tag Configuration: Click on “Tag Configuration” and select “Google Analytics: GA4 Event” as the tag type.
Step 2: Configure the Event Tag
 Choose the GA4 Configuration Tag: If you already have a GA4 configuration tag, select it. If not, create a new one by entering your GA4 Measurement ID.
- Name the Event: Enter an event name such as
on_page_time_tracker.
Step 3: Add Event Parameters
- Add Event Parameter: Click on “Event Parameters” and then “Add Row”.
- Name the Parameter: Enter a parameter name like
on_page_time_spent. - Set the Value: Set the value to
5(this represents the 5 seconds interval).
Step 4: Create a Timer Trigger
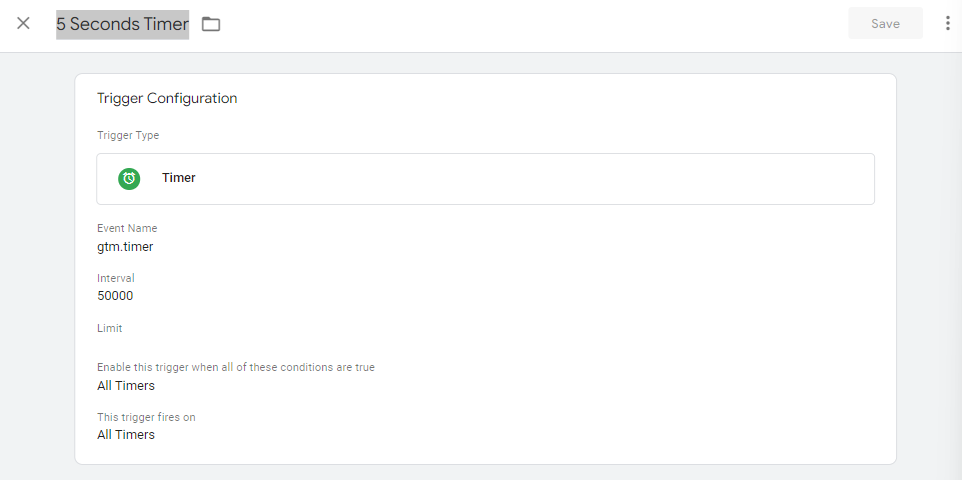
- Navigate to Triggers: Click on “Triggers” in the left-hand menu, then click on “New” to create a new trigger.
- Trigger Configuration: Click on “Trigger Configuration” and select “Timer” as the trigger type.
- Name the Trigger: Give the trigger an appropriate name, such as
5 Seconds Timer.
Step 5: Configure the Timer Trigger
-
- Set the Interval: Enter
5000milliseconds in the Interval field. - Set the Limit: Optionally, set the Limit to specify how many times the timer should fire per page. Leave it blank or set it as needed.
- Set the Conditions: Optionally, set conditions for the pages where the timer should fire. Use “Page URL” contains “/” to apply it to all pages.
- Save the Trigger: Click “Save” to save your new trigger and publish your container.
- Set the Interval: Enter
Step 6: Test the Published Tag
 Install TAGLAB debugging extension: If you haven’t already, install the free extension from the Chrome Web Store.
- Check for Events: Open your website with the extension active on the page for at least 5 seconds and watch for the
on_page_time_trackerevents firing every 5 seconds as a GA4 tag - View Event Details: Click on the events to view detailed information about each tag firing. Ensure that the
on_page_time_trackerevents include theon_page_time_spentparameter with the value set to 5.
Step 7: Create a Custom Metric
 Log in to Google Analytics: Navigate to your Google Analytics account.
- Select Property: Choose the property where you want to implement the custom metric.
- Navigate to Custom Definitions: In the left-hand menu, click on “Admin” at the bottom, then under the property column, click on “Custom Definitions” and select “Custom Metrics”.
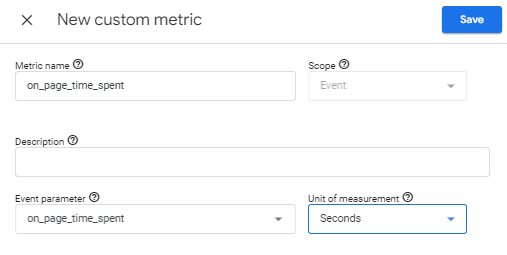
- Create Custom Metric: Click on the “+ New Custom Metric” button.
- Configure Custom Metric:
- Name: Enter a name such as
on_page_time_spent. - Scope: Set the scope to “Hit”.
- Unit of Measurement: Select “Seconds”.
- Name: Enter a name such as
- Save: Click “Create” to save your new custom metric.
Step 8: Create a Calculated Metric
 Navigate to Calculated Metrics: While still under custom definitions, select “Calculated Metrics”.
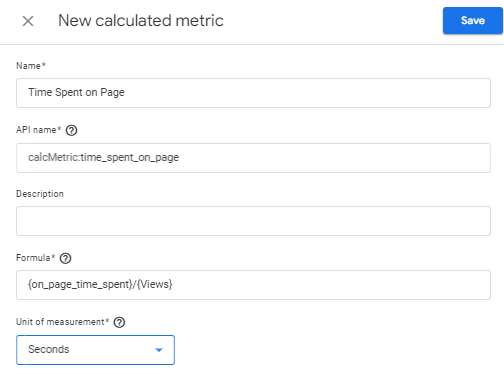
- Create Calculated Metric: Click on the “+ New Calculated Metric” button.
- Configure Calculated Metric:
- Name: Enter a name such as
Average Time on Page. - Formatting Type: Select “Time”.
- Formula: Enter the formula
{on_page_time_spent}/{Pageviews}. - Unit of Measurement: Ensure it is set to “Seconds”.
- Name: Enter a name such as
- Save: Click “Create” to save your new calculated metric.
How to Access and Analyze the Custom Time on Page Data in Google Analytics
- Log in to Google Analytics: Navigate to your Google Analytics account and select the property where you have implemented the custom time on page tracking.
- Navigate to Reports: Go to the “Reports” section in the left-hand menu.
- Custom Reports:
- Create Custom Report: Click on the pencil icon to customize existing reports or create a new one by clicking on the reports library and add a new report.
- Report Content: Name your report (e.g., “Custom Time on Page Analysis”), add a report tab, and include the following:
- Metrics: Add
Average Time on Page(your calculated metric) andon_page_time_spent(your custom metric). - Dimensions: Add dimensions such as “Page Title”, “Page Path”, or any other relevant dimensions.
- Metrics: Add
- Save and View: Save the custom report and view the data. Analyze the average time users spend on different pages to identify trends and insights.
Once you have implemented the custom time on page metric, you can access and analyze this data effectively in Google Analytics. This custom metric can be used in the Exploration Mode of Google Analytics to conduct deeper analysis and gain more detailed insights into user behavior. Additionally, you can leverage Google Looker Studio to create flexible and detailed reports and dashboards. Google Looker Studio allows you to integrate various data sources and visualize your custom metrics in a comprehensive manner, enabling you to gain a deeper understanding of user engagement on your website.
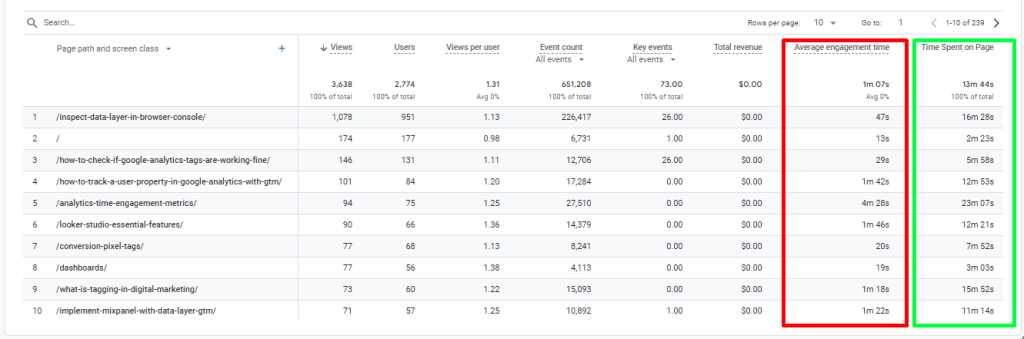
Analyzing Time Spent on Page Custom Metric
After adding your new metric to your GA4 reports or importing it for analysis in Google Looker Studio for example, you can compare it to Google Analytics’ default average duration metric. You’ll likely notice significant differences, especially on landing pages with a relatively low average pages per session.
These differences arise because the time between the last tracked interaction and the actual exit time of users isn’t fully captured, leading to an inflated average for the time on page duration metric. Increasing the average benchmark of your custom implemented metric Vs. Google’s default “Average enegagement time” metric while bringging accuracy to the scene.
Final Words
Beyond tracking time on page, there are numerous advanced tracking techniques available. Consider exploring other custom metrics and event tracking options to further refine your understanding of user interactions and optimize your digital strategies.
Related Readings
- Understanding Time Metrics in Google Analytics: A comprehensive guide on how Google Analytics tracks time metrics and the limitations of the default tracking method .
- Using Google Tag Manager for Advanced Tracking: Learn how to set up advanced tracking tags in Google Tag Manager to capture more precise user interaction data.
- Creating Custom Reports in Google Analytics: Step-by-step instructions for building custom reports in Google Analytics to analyze specific metrics and dimensions.
- Leveraging Google Looker Studio for Data Visualization: Explore how to use Google Looker Studio with our Marketing KPI dashboards.
- Optimizing Website Performance with User Engagement Metrics: Tips and best practices for using engagement metrics to improve your website’s performance and user experience .
Frequently Asked Questions
Why is Google Analytics’ default time on page tracking inaccurate?
Google Analytics’ default time on page tracking is based on the difference between the timestamps of consecutive page views. This method does not account for the time spent on the last page of a session, leading to inaccuracies, especially for sites with low page views per session.
How does a custom time on page metric improve accuracy?
A custom time on page metric improves accuracy by sending frequent time measurement events (e.g., every 5 seconds). This continuous tracking ensures that the time spent on each page, including the last page of a session, is accurately recorded.
What tools are needed to implement a custom time on page metric?
To implement a custom time on page metric, you need Google Tag Manager to configure and send the time measurement events, and Google Analytics to receive and analyze these events. Optionally, you can use Google Looker Studio for advanced reporting and visualization.
Can I use the custom time on page metric in Google Analytics reports?
Yes, you can use the custom time on page metric in Google Analytics reports, including custom reports and Exploration Mode, for detailed analysis. You can also leverage Google Looker Studio for creating comprehensive dashboards and reports.
What are the benefits of using Google Looker Studio for reporting?
Google Looker Studio offers flexible and detailed reporting options, allowing you to integrate various data sources and create customized dashboards. This helps you gain deeper insights into user engagement and optimize your website’s performance.