Your cart is currently empty!
Cross Domain Tracking with Mixpanel and Google Tag Manager
Table of Contents
- Understanding Cross Domain Tracking
- Subdomain Tracking
- Solutions for Cross Domain Tracking with Other Analytics Tools
- How to Approach to Cross Domain Tracking with Mixpanel
- Final Words
- FAQs
- What is cross domain tracking?
- Why is cross domain tracking important?
- How does Mixpanel handle cross domain tracking?
- Do I need to configure cross domain tracking for subdomains?
- Can other analytics tools handle cross domain tracking?
- What are the steps to implement cross domain tracking in Mixpanel using Google Tag Manager?
- How can I test and debug cross domain tracking implementation?
- Should I seek professional support for implementing cross domain tracking?
- How can I get professional assistance for analytics implementation and digital marketing?
Cross domain tracking is essential for accurately monitoring user behavior across different domains. In this article, we will dive into the significance of cross domain tracking, potential issues arising from its absence, and how tools like Mixpanel, Google Analytics, and others address this challenge. We will also provide a step-by-step guide to implementing cross domain tracking using Google Tag Manager for Mixpanel set ups and debugging techniques using the TAGLAB Chrome extension.
Understanding Cross Domain Tracking

Cross domain tracking allows you to track a single user across multiple domains. This is crucial for businesses with multiple websites or domains, ensuring a unified view of user interactions and behavior. Without proper cross domain tracking, several issues can arise:
- Fragmented User Journey: Incomplete user journeys due to fragmented tracking can lead to inaccurate analysis.
- Inaccurate Marketing Reports: Difficulty in associating actions with the correct source or medium.
- Incomplete Funnels: Disjointed data can result in incomplete conversion funnels, impacting decision-making.
For example, if a user visits your main website and then moves to a blog on a different domain, without cross domain tracking, these actions might be seen as two separate visits. This fragmentation can distort your marketing channel reports and user behavior analysis.
Subdomain Tracking
For subdomain tracking, Mixpanel can automatically identify users since they fall under the same parent domain. This negates the need for cross domain tracking setup. However, when dealing with entirely different domains, additional configuration is necessary.
Solutions for Cross Domain Tracking with Other Analytics Tools
Google Analytics:
Google Analytics offers a dedicated configuration for cross domain tracking. This setup helps preserve the session and client ID across domains, providing a seamless tracking experience. Here’s how you can enable it:
- Go to Admin > Property > Tracking Info > Cross Domain Tracking.
- Add the domains you want to track.
Other Tools:
- Adobe Analytics: Uses similar techniques to maintain user sessions across domains.
- Matomo (formerly Piwik): Offers built-in support for cross domain tracking.
How to Approach to Cross Domain Tracking with Mixpanel
Implementing cross domain tracking is essential for accurate user behavior analysis across multiple domains. By using Mixpanel and Google Tag Manager, you can ensure seamless tracking and data integration. Here’s a high-level overview of how this can be achieved:
You can solve the cross domain tracking issue in Mixpanel by capturing the user ID and appending it as a query string parameter to links pointing to third-party domains. Here’s how it works:
- Capture User ID: First, you need to capture the user ID from Mixpanel. This ID uniquely identifies a user and is used to track their interactions across different domains.
- Append User ID to URLs: Once you have the user ID, append it as a query string parameter to all links that point to third-party domains. This ensures that the user ID is carried along with the user as they navigate to different domains and ensures that unique users are tracked accross different domains.
- Read Query String Parameter: On the target domain, a script reads the user ID from the query string parameter. This script ensures that the user ID is captured as soon as the user lands on the new domain.
- Identify User in Mixpanel: The captured user ID is then used to identify the user in Mixpanel on the target domain. This step is crucial for maintaining a continuous user session across different domains, ensuring that all interactions are tracked accurately under the same user ID.
When user ID is captured and passed from one domain to another, it ensures that the user identity is transferred seamlessly across different domains. Here’s how this addresses the common issues in cross domain tracking:
- Maintains Continuous User Sessions: By appending the user ID to links, the user’s session is preserved across domains. This means that their interactions are recorded under the same user profile, preventing fragmentation of user data.
- Accurate Attribution of Actions: With the user ID being consistently tracked across domains, it is possible to accurately attribute actions to their original source or medium. This improves the accuracy of marketing channel reports and helps in understanding the effectiveness of different channels.
- Complete Funnels: The continuous tracking of user IDs ensures that user actions are linked across domains, resulting in complete and accurate conversion funnels. This enables businesses to analyze the full customer journey, from initial interaction to final conversion, without losing any critical data.
- Enhanced User Behavior Analysis: The integration of user data across domains allows for comprehensive analysis of user behavior without duplication due to multiple identies of users.
By implementing this solution, you address the challenges of fragmented tracking and ensure a cohesive and accurate view of user behavior across multiple domains. Of course, if your set up is up and running without cross domain tracking, you can expect an inflated number of users due to duplicated user counts across the domains.
Step-by-Step Implementation Using Google Tag Manager
To implement cross domain tracking with Mixpanel and Google Tag Manager, we will create two custom HTML tags. One tag will capture and append the user ID to URLs pointing to third-party domains, and the other will read the user ID from the query string on the target domain and identify the user in Mixpanel.
Step 1: Create the Custom HTML Tag to Append User ID to URLs
- Log in to Google Tag Manager and select the container for your main domain.
- Create a New Tag:
- Click on “Tags” in the left-hand menu.
- Click on the “New” button.
- Name the tag (e.g., “Append User ID to URLs”).
- Configure the Tag:
-
- Click on “Tag Configuration”.
- Select “Custom HTML”.
- Paste the following script into the HTML text area:
<script> (function() { function getDistinctId() { return mixpanel.get_distinct_id(); } function appendUserIdToUrls() { const distinctId = getDistinctId(); if (!distinctId) { console.error('Distinct ID not found'); return; } const anchors = document.querySelectorAll('a'); const thirdPartyDomainPattern = /^(https?:\/\/)?((?!yourdomain\.com).)+$/i; anchors.forEach(anchor => { const href = anchor.getAttribute('href'); if (href && thirdPartyDomainPattern.test(href)) { try { if (href.startsWith('http://') || href.startsWith('https://')) { const url = new URL(href); url.searchParams.append('user_id', distinctId); anchor.setAttribute('href', url.toString()); } } catch (e) { console.error('Invalid URL:', href); } } }); } appendUserIdToUrls(); })(); </script> -
- Set the Trigger:
- Click on “Triggering”.
- Select the “All Pages” trigger.
- Save the Tag.
Step 2: Create the Custom HTML Tag to Read and Identify User ID
- Log in to Google Tag Manager and select the container for your target domain.
- Create a New Tag:
- Click on “Tags” in the left-hand menu.
- Click on the “New” button.
- Name the tag (e.g., “Identify User with Query String Parameter”).
- Configure the Tag:
- Click on “Tag Configuration”.
- Select “Custom HTML”.
- Paste the following script into the HTML text area:
<script>
(function() {
    function getQueryStringParameter(name) {
        const urlParams = new URLSearchParams(window.location.search);
        return urlParams.get(name);
    }

    const userId = getQueryStringParameter('user_id');

    if (userId) {
        mixpanel.identify(userId);
        console.log(`Mixpanel identified with user_id: ${userId}`);
    } else {
        console.log('user_id query parameter not found');
    }
})();
</script>
- Set the Trigger:
- Click on “Triggering”.
- Select the “All Pages” trigger.
- Save the Tag.
Step 3: Debugging with TAGLAB Chrome Extension
To ensure your cross domain tracking setup is working correctly, you can use the TAGLAB Chrome extension:
- Install the Extension: Download and install the TAGLAB extension from the Chrome Web Store.
- Navigate Between Domains: Navigate between your domains simulating a regular user interaction
- Observe the Query String Parameter: Verify that the
user_idparameter is being correctly appended on the destination URL.
- Monitor Requests: Use the extension to monitor Mixpanel tags on both pages. You should be able to cleary see the same value on both websites of
distinct_id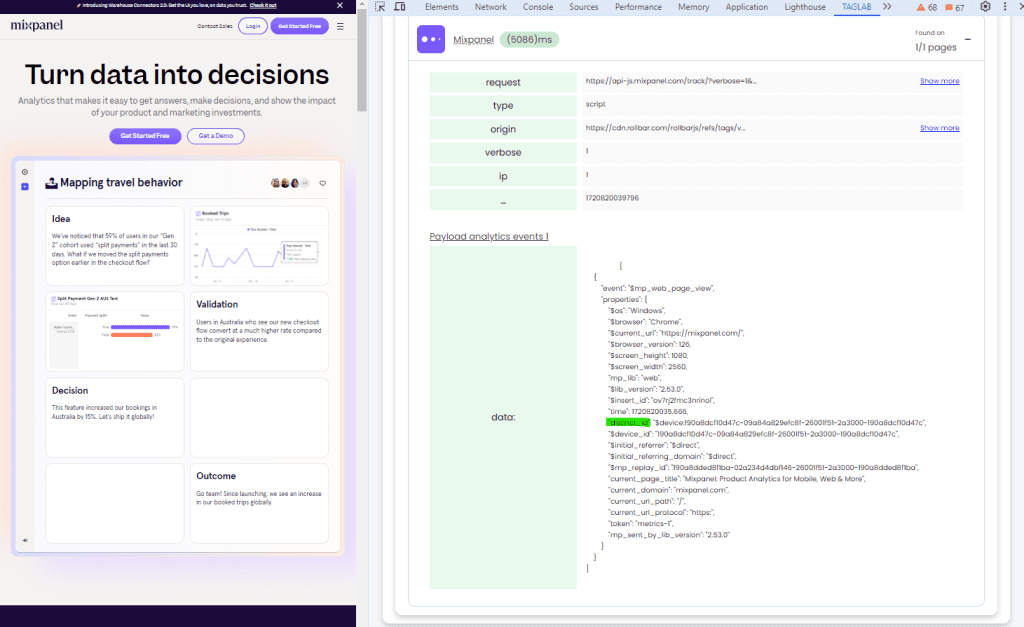
Final Words
Implementing cross domain tracking is essential for accurate user behavior analysis across multiple domains. By using Mixpanel and Google Tag Manager, you can ensure seamless tracking and data integration. For complex implementations and to avoid potential pitfalls, it’s recommended to seek professional support from an analytics implementation consultant.
If you would like to work with experts in analytics implementation and digital marketing, contact us for professional assistance.
References and Further Reading
- Implement Mixpanel with Existing Google Tag Manager & Data Layer for Google Analytics
- How to enable Cross-Domain Tracking in GA4 in 3 steps
- Implement Scroll Rate Tracking with Mixpanel: A Step-by-Step Guide
- Implement Page Average Scroll Rate Tracking for Google Analytics 4 with GTM
- Enhancing Content Marketing for Web Analytics & Digital Marketing
- How to test your web analytics is collecting accurate data
- Data Layer Best Practices and Data Validation Software
FAQs
What is cross domain tracking?
Cross domain tracking is the process of tracking user interactions across multiple domains as a single session. This ensures that the user’s journey is tracked accurately, providing a comprehensive view of their interactions across different websites.
Why is cross domain tracking important?
Without cross domain tracking, user sessions can become fragmented when they navigate between different domains. This can lead to inaccurate data, incomplete funnels, and difficulty in attributing actions to the correct sources. Cross domain tracking ensures a unified view of the user journey, leading to better data analysis and insights.
How does Mixpanel handle cross domain tracking?
Mixpanel requires additional configuration for cross domain tracking. By capturing the user ID and appending it as a query string parameter to links pointing to third-party domains, and then reading and identifying this ID on the target domain, Mixpanel can maintain continuous user sessions across multiple domains. Unlike Google Analytics, Mixpanel does not provide a native solution for cross domain tracking.
Do I need to configure cross domain tracking for subdomains?
No, cross domain tracking is not necessary for subdomains. Mixpanel can automatically track users across subdomains as they fall under the same parent domain, ensuring user sessions are not fragmented. However, for domains that don’t allow cross-subdomain cookies, set cross_subdomain_cookie: false. Alternatively, use a CNAME to change from yourdomain.herokuapp.com to yourdomain.com.
Can other analytics tools handle cross domain tracking?
Yes, other analytics tools like Google Analytics have dedicated configurations for cross domain tracking. These tools can preserve the session and client ID across domains, ensuring accurate tracking of user interactions. However, the setup process may vary depending on the tool.
What are the steps to implement cross domain tracking in Mixpanel using Google Tag Manager?
The steps include creating custom HTML tags in Google Tag Manager to capture the user ID, append it to URLs, and read and identify the user ID on the target domain. This ensures seamless tracking of user interactions across multiple domains. Detailed steps are provided in the implementation section of this guide.
How can I test and debug cross domain tracking implementation?
You can use Google Tag Manager’s Preview mode to ensure that the tags are firing correctly. Additionally, the TAGLAB Chrome extension can be used to monitor network requests and verify that the user_id parameter is correctly appended and recognized. This helps in ensuring the implementation is working as expected.
Should I seek professional support for implementing cross domain tracking?
Yes, for complex implementations and to avoid potential pitfalls, it’s recommended to seek professional support from an analytics implementation consultant. Experts can provide tailored solutions and ensure that the setup is optimized for accurate and comprehensive data tracking.
How can I get professional assistance for analytics implementation and digital marketing?
If you would like to work with experts in analytics implementation and digital marketing, contact us for professional assistance. Our team can help you with tailored solutions for your cross domain tracking needs and other analytics and marketing requirements.