Your cart is currently empty!
How to set up Google Analytics 4 tracking code on your website in 5 mins
Posted by:
|
On:
|
- Key Features of GA4
- Setting Up a Google Analytics 4 Property
- Integrating Google Analytics 4 Using Google Tag Manager
- Expanding GA4 Integration Across Various Platforms
- Best Practices and Common Pitfalls in Implementing Google Analytics 4
- Final Words
- Frequently Asked Questions About Google Analytics 4 Integration
Key Features of GA4
- Event-Based Measurement: Unlike the session-based approach of Universal Analytics, GA4 operates on an event-based model. This allows for a unified view of user interactions across websites and apps, enabling a deeper understanding of the customer journey.
- Cross-Platform Tracking: GA4 excels in tracking user activities across various devices and platforms without relying solely on cookies. This is increasingly vital as the industry moves towards more stringent privacy practices and phasing out third-party cookies.
- Integration with Google’s Advertising Platforms: GA4 is designed to work seamlessly with Google Ads, allowing for improved campaign management based on user engagement and conversion data from your analytics.
- Customization and Control: GA4 offers extensive customization options for data collection and reporting. Users can tailor their analytics environment to focus on the metrics that are most relevant to their specific business needs, improving the usability and relevance of the data collected.
This guide aims to provide a comprehensive walkthrough for setting up and maximizing Google Analytics 4. From initial setup to advanced configuration, we’ll cover how to adapt your analytics practices to take full advantage of GA4’s capabilities, ensuring that your business remains competitive and data-driven in an evolving digital landscape.
Next, we will delve into the step-by-step process of setting up a GA4 property, highlighting best practices and practical tips to optimize your analytics setup efficiently.
Setting Up a Google Analytics 4 Property
Creating and configuring a new GA4 property is the first critical step in transitioning to Google Analytics 4. This section will guide you through the process step-by-step, ensuring that you can effectively start collecting data from your website and gain insights quickly.
Step 1: Create a GA4 Property
- Access Google Analytics: Start by navigating to the Google Analytics website analytics.google.com and sign in using your Google account.
- Navigate to Admin: Once logged in, locate the Admin gear icon in the lower left corner of your dashboard to access the administrative settings.
- Create Property: In the Admin section, select the “Create Property” button. You’ll be prompted to enter details about your new property.
- Property Setup: Enter your property name, which could be the name of your business or website. Select the reporting time zone and currency appropriate for your location and business operations.
Step 2: Configure Your Data Stream
- Select Data Stream Type: Choose “Web” as your data stream type to track data from your website. Other options include iOS app and Android app, should you need to track mobile applications.
- Add Website Details: Provide your website URL and name. Ensure that the URL is correct because this is where GA4 will collect data.
- Set Enhanced Measurement: GA4 offers an ‘Enhanced Measurement’ option that automatically tracks certain types of interactions like scrolls, outbound clicks, site search, video engagement, and file downloads. You can toggle these options according to your needs.
Step 3: Obtain Your Measurement ID
- Measurement ID: After setting up your data stream, GA4 will provide you with a ‘Measurement ID’ that starts with ‘G-’. This ID is crucial as it will be used to link your website with your GA4 property.
- Tag Installation: Use this Measurement ID in your website’s tracking code or within Google Tag Manager to begin sending data to your GA4 property.
Step 4: Implement the Tracking Code
After you have set up your property, now you need to implement the tracking on your website. There are several ways to do that, depending on your website. Google Suggests the following:
- Direct Implementation: If not using Google Tag Manager, embed the GA4 tracking code (gtag.js) directly into the HTML of every page you wish to track, just before the closing
</head>tag. - Using Google Tag Manager: Alternatively, if you are using GTM, create a new tag for GA4 using the Measurement ID and configure triggers to define when data should be sent to GA4.
But we will deepdive more into this in the next steps.
Integrating Google Analytics 4 Using Google Tag Manager
Utilizing Google Tag Manager (GTM) to deploy Google Analytics 4 (GA4) enhances the flexibility and control you have over your tracking implementations. It simplifies the process of updating and maintaining your site’s analytics and marketing tags without modifying any website code. This section will focus on using an existing GTM setup to integrate GA4 effectively.
Step 1: Configure GA4 Configuration Tag in GTM
- Access Your GTM Account: Log into your GTM dashboard. If you do not have GTM set up, ask your developer to include the GTM script in your website’s code.
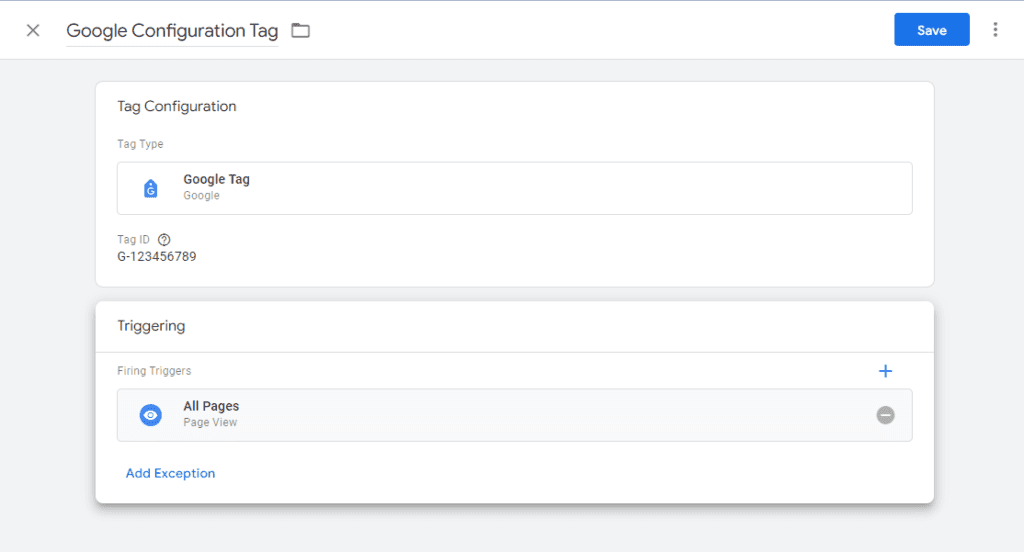
- Create GA4 Configuration Tag: Navigate to the ‘Tags’ section and select ‘New’ to create a new tag. Choose ‘Google Analytics: GA4 Configuration’ as the tag type. This tag will serve as the universal tag for all Google products, managing the configuration and data collection for GA4.
- Enter Measurement ID: Input your GA4 Measurement ID, which you can find in your GA4 property settings under ‘Data Streams’. This ID is essential for linking your GTM to your GA4 property.
- Set All Pages Trigger: Apply the ‘All Pages’ trigger to ensure that the GA4 Configuration Tag fires on every page of your site. This setup enables basic page tracking across your entire website.

Step 2: Set Up Advanced Tracking with Custom Event Tags
For more granular tracking beyond basic page views, you can create custom event tags based on specific interactions you want to monitor:
- Identify Key User Interactions: Determine which user actions are critical to track, such as button clicks, form submissions, or file downloads.
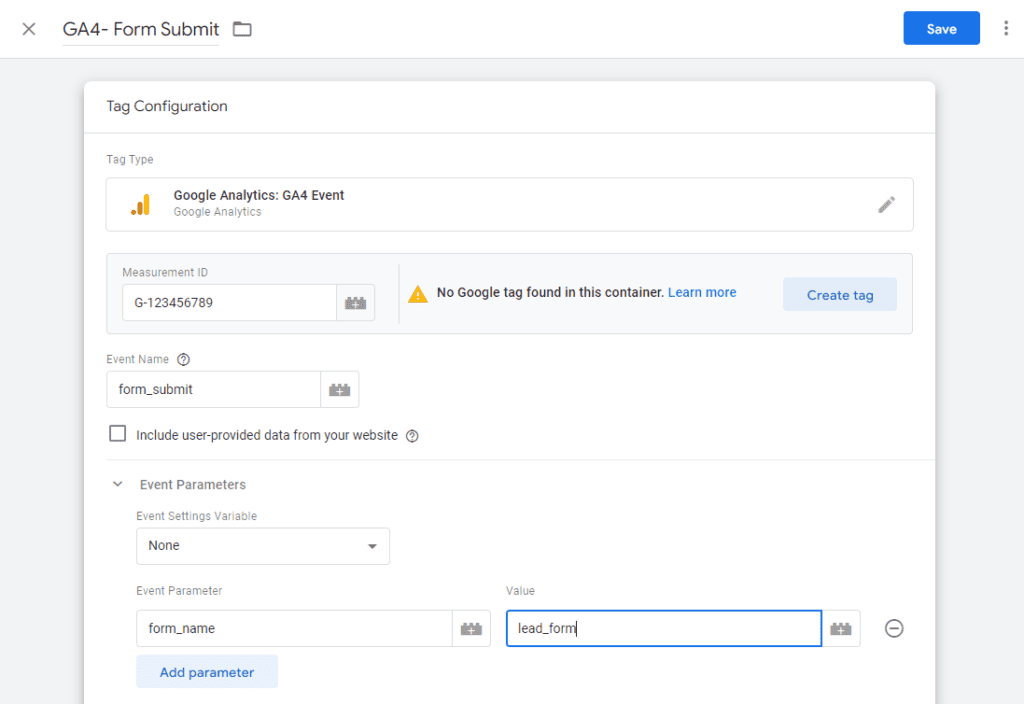
- Create Custom Event Tags: For each identified interaction, create a new tag in GTM. Select ‘Google Analytics: GA4 Event’ as the tag type. Configure the tag with appropriate event parameters such as ‘event_name’, ‘event_category’, etc., that correspond to the actions you are tracking. In the below example we will define a parameter called “form_name”
- Configure Triggers for Each Event: Set up triggers that determine when these event tags should fire. These can be based on user actions like clicks or form submissions, captured by using GTM’s built-in triggers or by defining custom triggers.

Step 3: Testing and Validation
Before making any tags live, it’s crucial to ensure they function as expected:
- Preview and Debug: Use GTM’s preview and debug modes to test the tags. This allows you to verify that the tags fire at the correct times and capture the intended data without affecting your live site.
- Validate Data in GA4: Check your GA4 reports to ensure that data from your custom events is appearing as expected. This validation confirms that your GA4 integration is capturing comprehensive analytics data.
Step 4: Optimization and Ongoing Management
Regular monitoring and optimization of your GTM and GA4 setup are essential:
- Monitor Tag Performance: Keep an eye on the performance of your tags through GTM’s version history and error reporting tools.
- Refine and Update Tags: As your site evolves and new tracking requirements emerge, periodically review and update your tags and triggers to ensure optimal data collection and compliance with digital analytics best practices.
Expanding GA4 Integration Across Various Platforms
Integrating Google Analytics 4 (GA4) extends beyond just using Google Tag Manager. Many content management systems (CMS) and e-commerce platforms offer simplified options to integrate GA4, accommodating users who may not be familiar with GTM or prefer direct integration methods. This section covers how to deploy GA4 across various platforms, using direct scripts as well as platform-specific extensions or plugins.
1. Direct Script Integration
For websites that do not use a CMS or for those who prefer a direct approach:
- Embedding GA4 Directly: Insert the GA4 global site tag (gtag.js) directly into the HTML of your website. This script should be placed in the
<head>section of each webpage you wish to track or in a common header file that is included across your site. - Customization: Direct script integration allows for deep customization directly within the code, enabling advanced tracking setups such as user ID tracking or enhanced ecommerce analytics.
2. CMS-Specific Plugins and Extensions
Different CMS platforms like WordPress, Joomla, or Drupal often have plugins or extensions specifically designed to simplify the integration of GA4:
- WordPress: Utilize plugins such as ‘GA Google Analytics’ or ‘MonsterInsights’ which offer easy GA4 integration. Simply install the plugin, enter your GA4 Measurement ID, and configure the settings according to your tracking requirements.
- Joomla: Extensions like ‘Joomla Google Analytics’ allow for straightforward integration. These extensions are typically managed within the Joomla admin panel.
- Drupal: The ‘Google Analytics Module’ for Drupal provides an interface to insert your Measurement ID and manage other GA settings directly from the Drupal dashboard.
3. E-commerce Platform Integration
For e-commerce platforms such as Shopify or Magento, integrating GA4 can help track detailed transaction and customer data:
- Shopify: Shopify has built-in support for GA4 integration in its analytics settings. Enter your Measurement ID in the Shopify admin under ‘Online Store’ settings, and Shopify handles the rest.
- Magento: Use Magento extensions like ‘Magento GA4 Integration’ to connect your GA4 account. These extensions typically offer additional features tailored for e-commerce analytics.
4. Testing and Verification
Regardless of the integration method, always verify that GA4 is correctly tracking data:
- Real-Time Reports: After integration, check GA4’s real-time reports to confirm that user interactions are being tracked across your site. Look for immediate feedback on user activities to ensure the tracking code is active.
- Consistency Check: Ensure data consistency across different sections of your website or e-commerce platform, especially after updates or changes to your site’s structure.
Best Practices and Common Pitfalls in Implementing Google Analytics 4
Implementing Google Analytics 4 (GA4) efficiently requires adherence to best practices while avoiding common pitfalls that can compromise your data’s accuracy and utility. This section outlines key strategies to optimize your GA4 setup and highlights typical errors to avoid, ensuring a robust and reliable analytics framework.
Best Practices for GA4 Implementation
1. Comprehensive Planning
- Understand Business Objectives: Clearly define what you want to achieve with GA4, aligning your tracking setup with key business goals.
- Audit Existing Setup: Review any previous analytics configurations to ensure that your transition to GA4 doesn’t leave gaps in data collection or reporting.
2. Detailed Configuration
- Utilize GA4’s Configuration Flexibility: Take advantage of GA4’s customizable options, such as custom dimensions, metrics, and event tracking, to tailor the setup to your specific needs.
- Set Up Enhanced Measurement: Enable enhanced measurement features in GA4 to automatically track basic interactions like scrolls, outbound clicks, and site searches without additional coding.
3. Rigorous Testing and Validation
- Use Debug Mode: Before going live, use GA4’s debug mode to test tracking setups and ensure data is being collected as intended.
- Validate Data Quality: Regularly check your GA4 data for accuracy and completeness, especially after making changes to your tracking configurations.
4. Continuous Learning and Adaptation
- Stay Updated: Keep up with new GA4 features and best practices as they evolve. Google frequently updates GA4, adding new capabilities and improving existing ones.
- Train Your Team: Ensure that your team understands how to use GA4 effectively. Consider investing in training or resources that help your staff leverage GA4’s full potential.
Common Pitfalls in GA4 Implementation
1. Incomplete Migration
- Missing Data Streams: Ensure that all relevant data streams are configured in GA4, especially if transitioning from Universal Analytics. Missing data streams can lead to gaps in data collection.
- Overlooking Tag Updates: Failing to update all tags during the transition can lead to inconsistent data. Make sure all tags, especially custom event tags, are correctly configured in GA4.
2. Misconfigured Tags and Triggers
- Incorrect Trigger Configurations: Inaccurately configured triggers in GTM can prevent data from being sent to GA4 or lead to inaccurate event tracking.
- Lack of Tag Testing: Not testing new or modified tags can result in errors going live, affecting data accuracy.
3. Data Integrity Issues
- Duplicate Data: Be cautious of implementing duplicate tags which can result in double-counting and skewed data.
- Ignoring Data Filters: Not setting up proper filters, especially in complex setups or when multiple users access the GA4 property, can lead to contaminated data sets.
4. Poor User Engagement Tracking
- Overlooking Important Interactions: Failure to track key user interactions as events can result in a lack of critical data needed for decision-making.
- Inadequate Conversion Tracking: Not properly configuring or tracking conversions can significantly diminish the value of your analytics data in measuring business outcomes.
Final Words
We recommend using Google Tag Manager as the most comprehensive way even though it requires specific knowledge and skills. While other options remain viable, it’s still up to you to decide if you want to learn it or lean on a consultant to help. Either ways, it may take some time for data to start appearing in your Google Analytics account after setting up the tracking code, so be patient and regularly check your account for updated data. If data does not show after 24 hours, learn how to check if analytics tags are working fine on your website.
Frequently Asked Questions About Google Analytics 4 Integration
What are the different ways to integrate Google Analytics 4 (GA4) on my website?
You can integrate GA4 through various methods depending on your platform and technical preference. Options include direct implementation using the global site tag (gtag.js), using Google Tag Manager (GTM) for a more dynamic approach, or utilizing platform-specific plugins on CMS systems like WordPress or Shopify where you simply enter your Measurement ID.
How do I set up GA4 using Google Tag Manager?
Set up GA4 in GTM by creating a new GA4 Configuration Tag with your Measurement ID and applying it to all pages using the ‘All Pages’ trigger. This method allows you to manage your tracking codes centrally and make updates without altering code directly on your site.
Can I integrate GA4 on e-commerce platforms like Shopify?
Yes, Shopify supports GA4 integration directly through its admin panel. Add your GA4 Measurement ID in the Shopify settings under ‘Online Store’ preferences, and Shopify will automatically handle the insertion of the GA4 code across your store.
Is there a plugin for integrating GA4 on WordPress?
Yes, WordPress users can choose from several plugins like ‘GA Google Analytics’ or ‘MonsterInsights’ to integrate GA4 easily. These plugins provide a user interface where you can input your GA4 Measurement ID and configure additional tracking options without coding.
How can I verify that GA4 is correctly tracking data on my site?
Check the ‘Real-Time’ report in your GA4 dashboard to see immediate data on user interactions. Additionally, using tools like Google Tag Assistant can help confirm that the GA4 tracking code is firing correctly on your site.


