Your cart is currently empty!
Utilizing Data Layer Variables in Google Tag Manager
Posted by:
|
On:
|

In the world of tracking website activity, data layer variables are like helpful tools that make things more accurate. We’ll be exploring how these tools can benefit us either to enrich events with additional data parameters or to use them as triggers to fire events and tags. Google Tag Manager (GTM) Is a handy tool that makes managing tracking stuff on a website way easier. GTM helps handle different tags such as marketing pixels & analytics solution, including ones that use data layer variables.
Understanding Data Layer Variables
Data layer variables are like labels that carry specific pieces of information on a website. They help in capturing and organizing data related to user interactions and actions.
The main job of data layer variables is to make sure we gather accurate and relevant information about what users are doing on a website. They act as messengers, conveying important details to analytics tools.
Here are few ways where such variables can be helpful:
- Using them as conditions to trigger tags or events
- Using them as event names
- Using them as event, user, or item parameters
- Using them as any other form of custom dimensions or metrics
- Using them to pass values to conversion pixels such as purchase or conversion value
In terms of efficiency, data layer variables streamline the process. Instead of relying on scattered bits of information, they organize data neatly, making it more efficient for analytics tools to understand and use.
Defining Variables with Google Tag Manager
Defining data layer variables into Google Tag Manager (GTM) is the first step towards using data lyaer variables. After you explore and test your data layer to make sure that your object is available on your website. In the below steps we will show you how to configure a GTM variable to track your product name from an initial existing data layer variable.
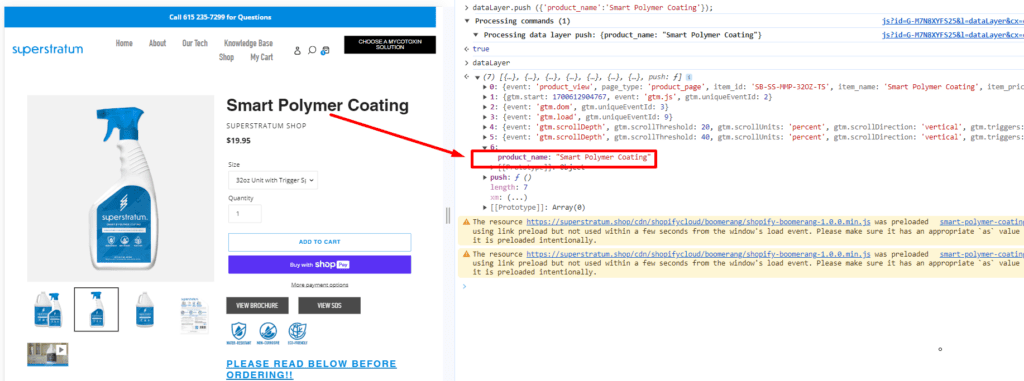
Here’s what you need to do in your GTM to make your data layer variables available as GTM variables:
1. Access GTM Dashboard: Log in to your Google Tag Manager account, and select your container that is set up on your website.
2. Navigate to Variables: In the left menu, go to “Variables.”
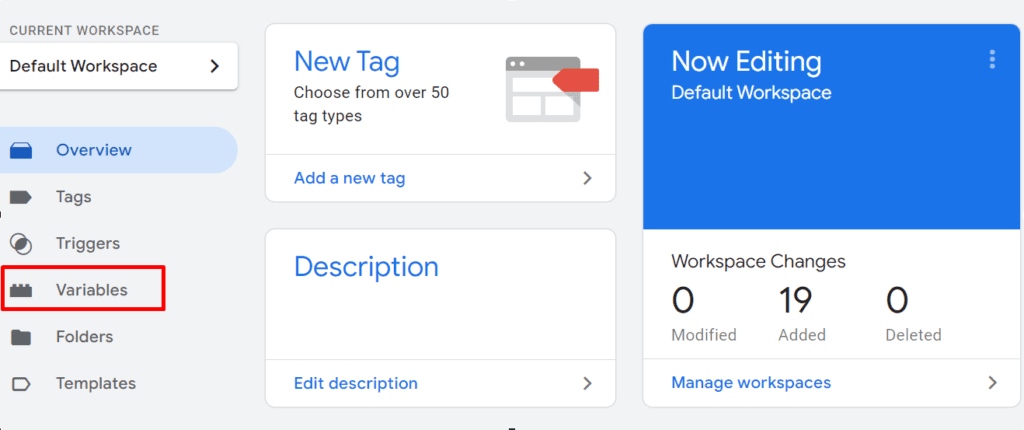
3. Create a New Variable: Scroll down to “User-Defined Variables” section and click on “New” to create a new variable.

4. Give your variable a good name (you will be using this name later in tags), and choose the variable type: Select “Data Layer Variable”.
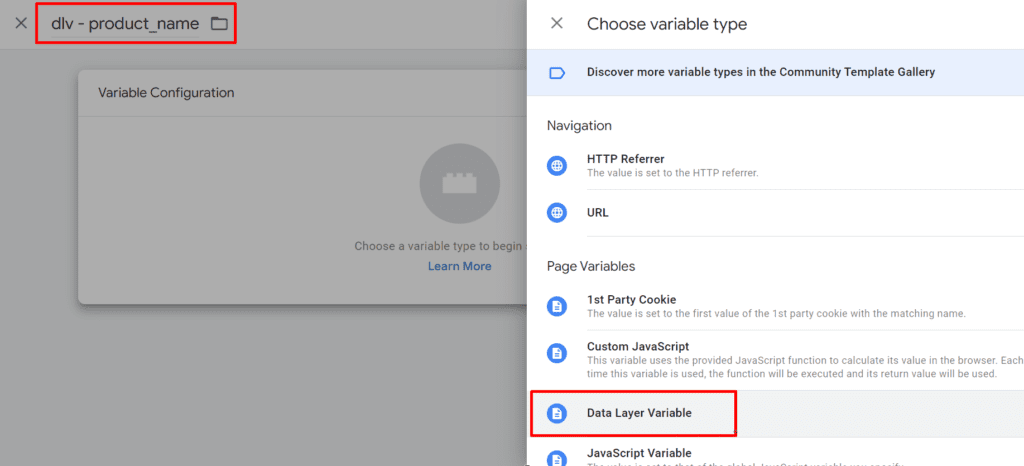
5. Configure Variable Details: Set up the variable details, such as the variable name and the key associated with the data layer.
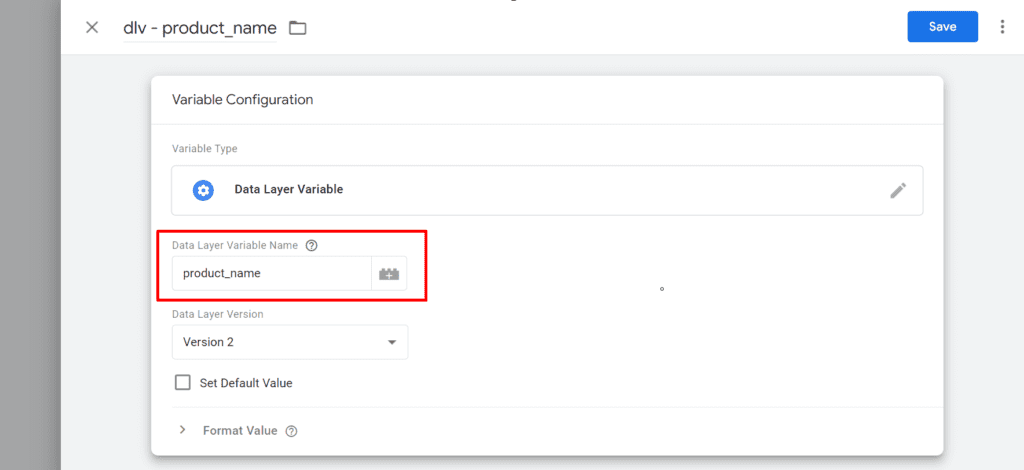
6. Save and Publish: Save your new variable, and don’t forget to publish the changes to make them live.
In case your data layer is using arrays or nesting variables under other highier level variables, you can access the lower level variables by using the the dot to describe how the specific variable can be reached in the hirearchy. For example to access the “postion” variable it would be necessary to input in GTM.
“ecommerce.impressions.0.position”.
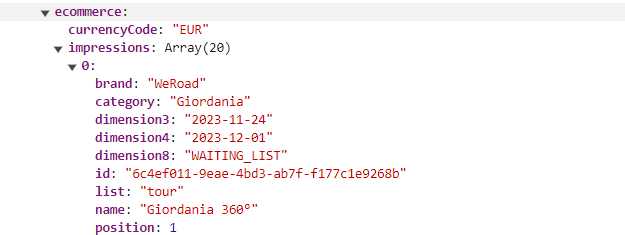
Take the time to set up all your data layer variables correctly in GTM for a hassle-free and reliable tracking experience. After you have completed this mapping, you can start using the variables that you defined to dynamically populate the values that they carry, such as our “product_name” example that would eventually be “Smart Polymer Coating”.
Common Use Cases: Exploring Data Layer Variables. Practical Examples in Action
Here below are some examples for inspiration to define you data layer variables and how to use them best
E-Commerce: Tracking Product Views
- Data Layer Variables:
- ‘productID’
- ‘productVariant’
- ‘productName’
- ‘category’
- ‘price’
- How They Work:The ‘productID’,’productVariant’, ‘productName’, and ‘category’ variables are generally discribed as product attributes. They uniquely identifies each product and provide valuable information for product oriented analysis such as product performances in terms of analytics events that can be measured and pivoted by these attributes. Such as product impressions, product clicks, product page views, product adds to cart, and purchases.’price’ records the price of the product. It would be essential for calculated metrics such as product purchase value and product add to cart total value
Lead Generation: Monitoring Form Submissions
- Data Layer Variables:
- ‘formType’
- ‘formName’
- ‘formField’
- How They Work:This set of variables allows precise tracking of form engagement, segregating forms by names or types, according to the service inquired or the reason of contact.
User Engagement: Analyzing Button Clicks
- Data Layer Variables:
- ‘buttonID’
- ‘buttonPosition’
- ‘callToAction’
- ‘buttonText’
- ‘buttonTarget’
- How They Work:Combining these variables offers insights into user interactions, helping optimize UI/UX and identify popular features. With variables like the above, it would be possibile to analyze different CTAs, their positioning, the most effective copies, and the most requested services by call to action.
E-Commerce: Cart & Checkout Steps
- Data Layer Variables:
- ‘cartID’
- ‘productList’
- ‘cartStep’
- How They Work:This set of variables allows a detailed understanding of cart process or abandonment patterns and reasons, enabling targeted recovery and conversion rate optimization.
These examples showcase how a combination of multiple data layer variables, each carrying distinct property names and values, contributes to a more granular and insightful picture of user interactions, behaviors, and specific scenarios.
Nesting Complex Data Structures within Data Layer Variables
Imagine you have a ‘userData’ variable. Instead of having just one layer of information, you can nest various properties within it. For example:
{ "userData": { "userID": "123456", "userPreferences": { "theme": "dark", "language": "en" }, "purchaseHistory": [ { "productID": "789", "purchaseDate": "2023-05-01" }, { "productID": "456", "purchaseDate": "2023-04-15" } ] } }
Here, ‘userData’ not only contains basic user info but also nests preferences and purchase history. This makes the data structure more organized and allows for a more detailed analysis of user behavior.
Benefits:
- Hierarchy: Creates a structured hierarchy for complex data.
- Comprehensive Insights: Provides a comprehensive view of user-related information.
- Efficient Analysis: Enables efficient analysis of nested properties.
Leveraging Data Layer Variables for Conditional Triggers and Advanced Tracking Scenarios
Let’s take an ‘interactionData’ variable as an example:
{ "interactionData": { "interactionType": "click", "elementID": "specialOfferButton", "customAttributes": { "isSpecialOfferClicked": true, "timeOnPage": 120 } } }
In this scenario, ‘interactionData’ not only captures the basic interaction details but also includes custom attributes like whether a special offer was clicked and the time spent on the page. This allows for conditional triggers and advanced tracking.
Benefits:
- Custom Conditions: Tailors tracking based on specific conditions or attributes.
- Advanced Insights: Provides more nuanced insights into user interactions.
- Flexible Tracking: Adapts tracking scenarios to unique user behaviors.
These advanced techniques enhance the versatility of data layer variables, offering a structured approach to complex data and enabling sophisticated tracking scenarios tailored to specific conditions or user attributes.
Debugging and Troubleshooting Data Layer Variables in Google Tag Manager
Google Tag Manager Preview Mode
Activate the Preview Mode in GTM to debug and preview how data layer variables are behaving in real-time.
Use the debug console to inspect variable values and interactions during different user scenarios.
Debugger Tools
Leverage browser developer tools to inspect network requests and examine data layer pushes.
Check the Console tab for any errors related to data layer variables.
GTM Preview Container Summary:
Review the Container Summary in GTM’s Preview Mode for an overview of triggered tags, including data layer variables.
Ensure that variables are populating as expected.
Common Issues and Troubleshooting Techniques
Variable Configuration Errors:
Issue: Incorrectly configured data layer variables.
Troubleshoot: Verify variable configurations in GTM, ensuring correct variable types and key names.
Missing Data Layer Pushes:
Issue: Data layer pushes not occurring as intended.
Troubleshoot: Inspect the website’s JavaScript to ensure data layer pushes are correctly implemented on relevant interactions.
Timing and Order of Operations:
Issue: Timing issues causing variables to fire before data layer pushes.
Troubleshoot: Adjust trigger conditions and ensure data layer pushes precede variable references.
Strategies to Minimize Data Layer Errors and Ensure Data Accuracy
Documentation and Training:
Document data layer variable setups comprehensively.
Train team members on correct variable configurations to reduce human errors.
Regular Audits:
Conduct regular audits of data layer implementations.
Use GTM’s Version History to track and revert to previous configurations if needed.
Error Logging:
Implement error logging within data layer pushes to capture issues in real-time.
Set up alerts for unusual data layer behavior.
Testing Environment:
Maintain a dedicated testing environment to catch and address potential issues before deploying changes to the live site. Use staging environments to simulate real-world scenarios.
[smart_post_show id=”16588″]


