Your cart is currently empty!
How to Implement GTM and Data Layer for Google Analytics in WordPress
Table of Contents
- Introduction
- Implementing the Base Tracking Code
- Tagging Pages With Data Layer Scripts
- Implementing Custom Data Layer Events for Forms
- Implementing E-commerce Events in WooCommerce
- Conclusion
- FAQs
- Why is tracking user behavior important for my WordPress site?
- What are the advantages of using Google Tag Manager on a WordPress site?
- How does the Data Layer enhance tracking capabilities?
- Can I track form submissions on my WordPress site?
- What are the challenges of using plugins for tracking implementation on WordPress?
- How do I implement enhanced e-commerce tracking in WooCommerce?
Introduction
In today’s digital landscape, understanding user behavior and tracking website performance are crucial for any business. Implementing tracking solutions like Google Analytics and Google Tag Manager on WordPress websites is essential for gaining valuable insights and optimizing marketing strategies. However, WordPress presents its own set of challenges when it comes to tracking implementation, particularly regarding the use of plugins.
WordPress Challenges and the Role of Plugins
WordPress is a highly flexible and widely used content management system (CMS) that powers millions of websites. Its vast library of plugins allows users to add a variety of functionalities without needing extensive coding knowledge. However, relying heavily on plugins can have both pros and cons, especially in the context of tracking implementation.
Pros:
- Ease of Use: Plugins make it easy to add complex features, such as tracking codes and data layers, without requiring advanced technical skills.
- Time Efficiency: Plugins save time by providing ready-made solutions that can be quickly installed and configured.
- Extensive Support: Many popular plugins are well-documented and supported, making troubleshooting and updates straightforward.
Cons:
- Compatibility Issues: With thousands of plugins available, conflicts between plugins can occur, leading to website performance issues or even crashes.
- Security Risks: Plugins can introduce vulnerabilities if they are not regularly updated or are developed by unreliable sources.
- Performance Impact: Excessive use of plugins can slow down a website, negatively affecting user experience and SEO rankings.
Given these pros and cons, it’s crucial to carefully select and manage plugins when implementing tracking solutions on WordPress sites.
Importance of Tracking and Analytics for Website Performance
Tracking user interactions and website performance metrics is vital for making informed decisions that drive business success. Analytics tools provide insights into visitor behavior, conversion rates, and the effectiveness of marketing campaigns. By understanding how users navigate and interact with a website, businesses can optimize content, improve user experience, and ultimately increase conversions and revenue.
Brief Overview of Google Analytics and Google Tag Manager
Google Analytics is a powerful web analytics tool that tracks and reports website traffic. It provides detailed insights into user behavior, including page views, session duration, bounce rates, and more. This information is essential for understanding audience engagement and identifying areas for improvement.
Google Tag Manager (GTM) is a tag management system that allows users to easily add and manage multiple tracking and marketing tags on their website without modifying the code directly. GTM simplifies the process of implementing tags, reducing the need for developer intervention and speeding up deployment times.
Role of Data Layer in Enhanced Tracking and Data Collection
The Data Layer is a critical component in advanced tracking setups. It acts as a centralized repository where information about user interactions and website elements is stored. This data can then be accessed and utilized by various analytics and marketing tools, ensuring consistent and accurate tracking across the site.
By leveraging the Data Layer, businesses can implement more sophisticated tracking scenarios, such as capturing custom events, tracking e-commerce interactions, and integrating with third-party platforms. This enhanced tracking capability leads to more precise data collection and better-informed decision-making.
Implementing the Base Tracking Code
Implementing the base tracking code on a WordPress website is a crucial first step in setting up Google Analytics and Google Tag Manager. This section will guide you through using a plugin like Code Snippets to inject the GTM code, ensuring a seamless and efficient process.
Using a Plugin Like WPCode to Inject the GTM Code
Plugins like Code Snippets provide a user-friendly interface to add custom code to your WordPress site without directly editing theme files. This approach reduces the risk of errors and makes managing custom code easier, especially during theme updates.
Why Use WPCode?
- Safety: Avoids direct modifications to theme files, reducing the risk of errors or conflicts.
- Organization: Keeps custom code snippets organized and manageable within the WordPress dashboard.
- Portability: Code snippets can be easily activated or deactivated, providing flexibility in managing customizations.
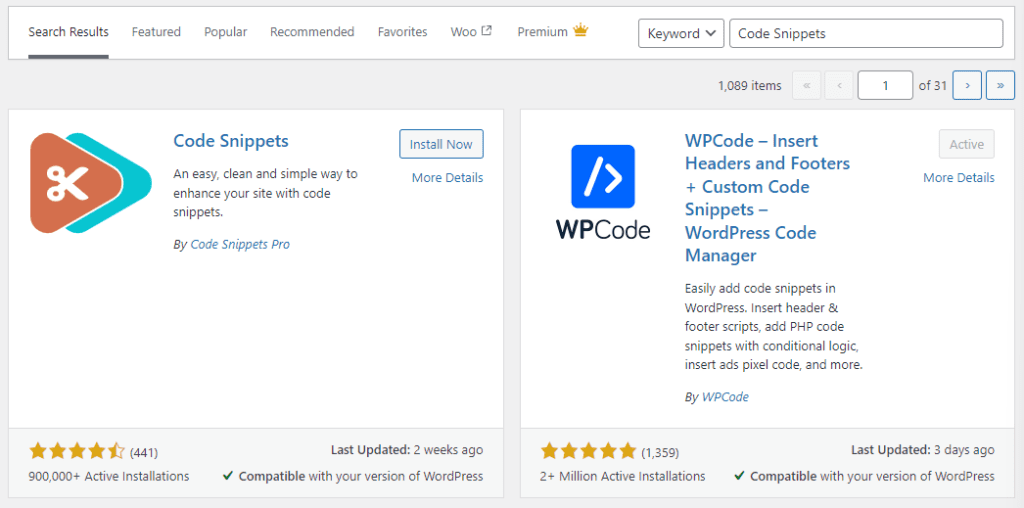
Step-by-Step Guide on Installing and Configuring Code Snippets
Install the Code Snippets Plugin
-
- Navigate to the WordPress dashboard.
- Go to
Plugins > Add New. - In the search bar, type “Code Snippets”.
- Find the plugin “WPCode – Insert Headers and Footers + Custom Code Snippets – WordPress Code Manager” and click
Install Now. - Once installed, click
Activate.
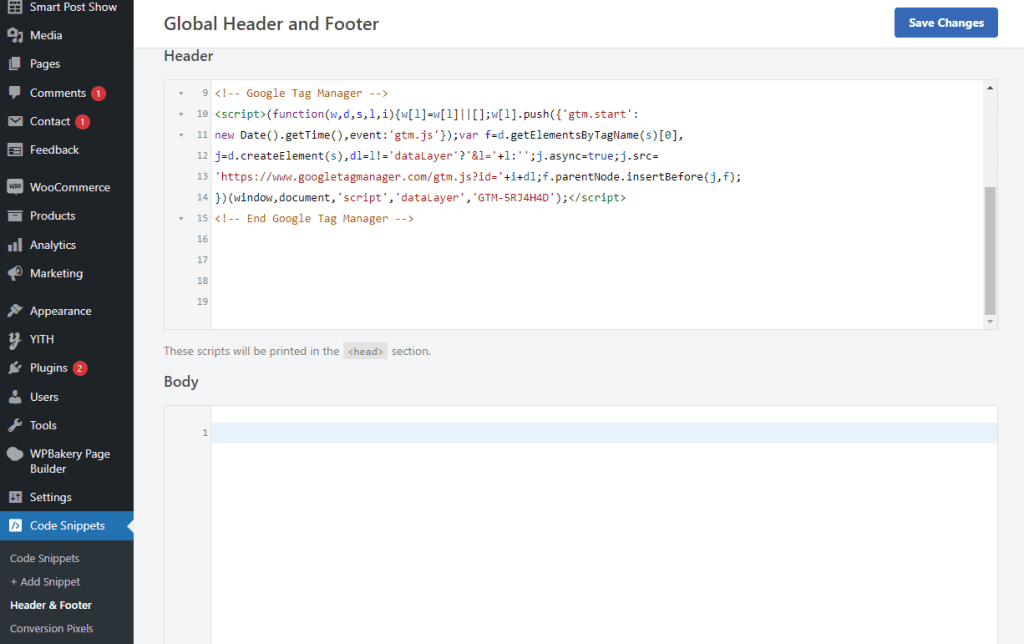
Inject your GTM Code Globally
-
- Navigate to the Code Snippets on WordPress left main pannel.
- Go to
Header & Footer > Header. - Copy and paste your entire GTM code in the header area.
- Click
Save Changes.
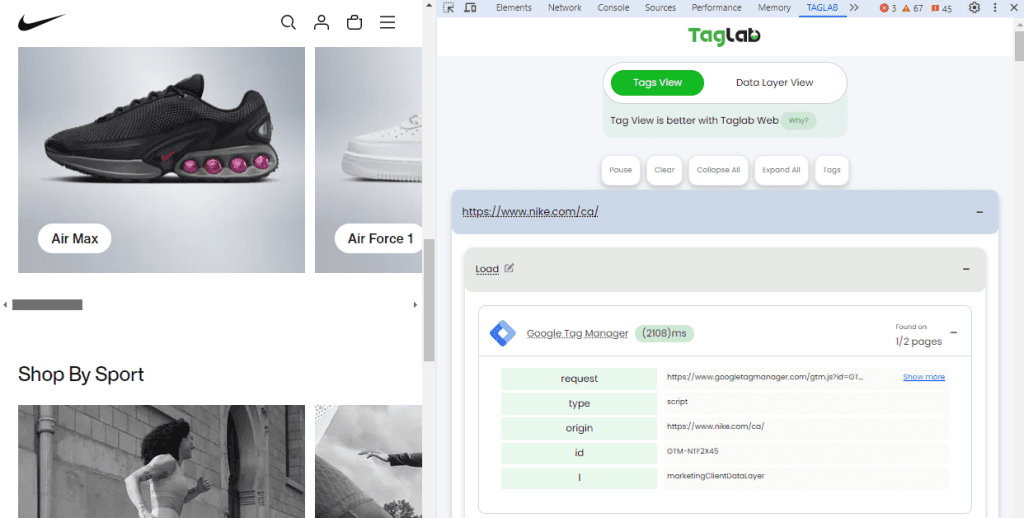
 Test your code
-
-
- Install TAGLAB Chrome Debugger from Google Chrome Store.
- Open your website.
- Right click on an empty are > click inspect
- Navigate to
TAGLABand make sure that the GTM tag is firing on your website. - Make sure that the GTM “id” value matches the GTM ID of your account
-
Tagging Pages With Data Layer Scripts
Tagging pages and posts is crucial for effective data collection and analysis. By tagging content, you can categorize and classify information, making it easier to track user interactions and measure performance. Proper tagging helps in:
- Enhanced Analytics: It allows for more granular data, enabling detailed analysis of user behavior on specific pages or posts.
- Better Targeting: Helps in identifying which content is most engaging, allowing for better-targeted marketing efforts.
- Improved SEO: Properly tagged content can improve search engine rankings by providing clear context and relevance to search engines.
- Content Organization: Facilitates better organization and management of content, making it easier to find and analyze specific pieces of information.
Adding Necessary Tagging Taxonomies
To effectively tag your pages and posts, it’s essential to set up proper taxonomies. Taxonomies are ways to group content together, typically using categories and tags. Here’s how you can add necessary tagging taxonomies:
- Categories:
- Go to the WordPress dashboard.
- Navigate to
Posts > Categories. - Add new categories that reflect the primary topics or themes of your content.
- Assign these categories to your posts to group similar content together.
- Tags:
- Go to the WordPress dashboard.
- Navigate to
Posts > Tags. - Add new tags that represent specific keywords or topics related to your content.
- Use these tags to further classify your posts, making them more discoverable and easier to analyze.
Implementing Data Layer Script Snippet on WordPress
The Data Layer is a JavaScript object that stores information you want to send to Google Tag Manager. Implementing a Data Layer script snippet on your WordPress site allows you to capture detailed data about user interactions and page attributes.
Why Use the Data Layer?
- Consistency: Ensures consistent data collection across different tags and triggers.
- Flexibility: Allows for custom data to be pushed, enabling advanced tracking scenarios.
- Accuracy: Helps in collecting accurate data by decoupling the data collection process from the actual tracking code.
Using functions.php or a Plugin for Custom Scripts
To add the Data Layer script to your WordPress site, you can either modify the functions.php file of your theme or use a plugin for custom scripts. Here’s how you can do it:
Using functions.php:
- Access functions.php:
- From the WordPress dashboard, navigate to
Appearance > Theme Editor. - In the theme files list, find and click on
functions.php.
- From the WordPress dashboard, navigate to
- Add Data Layer Script:
- Add the following code snippet to your
functions.phpfile to insert the Data Layer script:
- Add the following code snippet to your
function add_data_layer_script() {
if (is_single() || is_page()) {
global $post;
?>
<?php
}
}
add_action('wp_head', 'add_data_layer_script');
- Configure the Snippet:
- Below the code editor, you’ll see an option labeled
Where to Execute. SelectOnly run on site front-endto ensure the code is added to the public-facing part of your website. - Click
Save Changes and Activate.
- Below the code editor, you’ll see an option labeled
Implementing Custom Data Layer Events for Forms
Tracking form submissions is essential for lead generation and understanding user interactions on your WordPress site. By implementing custom Data Layer events, you can accurately capture and analyze these interactions. This section will guide you through tracking form submissions, setting up Data Layer events for Contact Form 7, providing a step-by-step guide on configuring these events, and integrating with other form plugins like Gravity Forms.
Tracking Form Submissions for Lead Generation
Forms are a primary tool for collecting leads on websites. Tracking form submissions allows you to measure the effectiveness of your lead generation efforts, understand user behavior, and optimize your forms for better performance. By using the Data Layer, you can push custom events to Google Tag Manager (GTM), making it easier to track and analyze form submissions.
Setting Up Data Layer Events for Contact Form 7
Contact Form 7 is a popular plugin for creating forms on WordPress sites. Setting up Data Layer events for Contact Form 7 involves pushing a custom event to the Data Layer when a form is successfully submitted.
Step-by-Step Guide on Configuring Data Layer Events for Contact Form 7:
- Install and Activate Contact Form 7:
- Navigate to the WordPress dashboard.
- Go to
Plugins > Add New. - Search for “Contact Form 7”.
- Install and activate the plugin.
- Create a New Form:
- Go to
Contact > Add New. - Design your form and save it.
- Go to
- Add Data Layer Event on Form Submission:
- Add the following JavaScript code to your theme’s
functions.phpfile or use a custom JavaScript plugin like “Insert Headers and Footers”.document.addEventListener('wpcf7mailsent', function(event) { window.dataLayer = window.dataLayer || []; window.dataLayer.push({ 'event': 'cf7submission', 'formId': event.detail.contactFormId, 'formName': event.detail.contactFormName }); }, false);
- Add the following JavaScript code to your theme’s
- Configure Google Tag Manager:
- Log in to your Google Tag Manager account.
- Go to your workspace and create a new trigger.
- Choose
Trigger Configuration > Custom Event. - Enter
cf7submissionas the Event Name. - Name your trigger (e.g., “CF7 Form Submission”) and save it.
- Choose
- Create a new tag.
- Choose
Tag Configuration > Google Analytics: GA4 Event. - Enter your GA4 Measurement ID.
- Set
Event Nametoform_submission. - Add event parameters:
formId:{{Click Element}}formName:{{Click Text}}
- Add the trigger you created earlier.
- Name your tag (e.g., “GA4 – CF7 Form Submission”) and save it.
- Choose
- Publish Changes:
- Click
Submitin GTM to publish your changes.
- Click
Integrating with Other Form Plugins like Gravity Forms
For other form plugins like Gravity Forms, the process is similar but requires different hooks or JavaScript events to push Data Layer events. Here’s how to set up Data Layer events for Gravity Forms:
- Install and Activate Gravity Forms:
- Navigate to the WordPress dashboard.
- Go to
Plugins > Add New. - Search for “Gravity Forms”.
- Install and activate the plugin.
- Create a New Form:
- Go to
Forms > New Form. - Design your form and save it.
- Go to
- Add Data Layer Event on Form Submission:
- Add the following JavaScript code to your theme’s
functions.phpfile or use a custom JavaScript plugin like “Insert Headers and Footers”.document.addEventListener('gform_confirmation_loaded', function(event) { window.dataLayer = window.dataLayer || []; window.dataLayer.push({ 'event': 'gfsubmission', 'formId': event.detail.formId, 'formTitle': event.detail.formTitle }); }, false);
- Add the following JavaScript code to your theme’s
- Configure Google Tag Manager:
- Log in to your Google Tag Manager account.
- Go to your workspace and create a new trigger.
- Choose
Trigger Configuration > Custom Event. - Enter
gfsubmissionas the Event Name. - Name your trigger (e.g., “GF Form Submission”) and save it.
- Choose
- Create a new tag.
- Choose
Tag Configuration > Google Analytics: GA4 Event. - Enter your GA4 Measurement ID.
- Set
Event Nametoform_submission. - Add event parameters:
formId:{{Click Element}}formTitle:{{Click Text}}
- Add the trigger you created earlier.
- Name your tag (e.g., “GA4 – GF Form Submission”) and save it.
- Choose
- Publish Changes:
- Click
Submitin GTM to publish your changes.
- Click
By implementing these custom Data Layer events for form submissions, you can effectively track and analyze user interactions with your forms, leading to better insights and optimization of your lead generation efforts.
Implementing E-commerce Events in WooCommerce
E-commerce tracking is vital for understanding customer behavior and optimizing sales strategies on your WordPress site. WooCommerce, the most popular e-commerce plugin for WordPress, allows for comprehensive tracking of various e-commerce events. By setting up the Data Layer, you can track product views, add-to-cart actions, and purchases, and implement enhanced e-commerce tracking for detailed insights.
Setting Up Data Layer for WooCommerce
To effectively track e-commerce events in WooCommerce, you need to set up the Data Layer. This involves configuring WooCommerce to push relevant data to the Data Layer, which can then be used by Google Tag Manager (GTM) and Google Analytics.
Why Use Data Layer for WooCommerce?
- Detailed Tracking: Captures granular details about e-commerce interactions.
- Consistency: Ensures consistent data collection across different pages and events.
- Flexibility: Allows for custom events and parameters to be tracked as needed.
Tracking Product Views, Add-to-Cart Actions, and Purchases
To track essential e-commerce interactions such as product views, add-to-cart actions, and purchases, you need to push specific data to the Data Layer. Here’s how you can do it:
1. Product Views:
- Add the following code to your theme’s
functions.phpfile to push product view data to the Data Layer:add_action('woocommerce_after_single_product', 'push_product_view_to_datalayer'); function push_product_view_to_datalayer() { global $product; ?> <?php }
2. Add-to-Cart Actions:
- Add the following code to your theme’s
functions.phpfile to push add-to-cart data to the Data Layer:add_action('wp_footer', 'push_add_to_cart_to_datalayer'); function push_add_to_cart_to_datalayer() { if (is_product()) { ?> <?php } }
3. Purchases:
- Add the following code to your theme’s
functions.phpfile to push purchase data to the Data Layer:add_action('woocommerce_thankyou', 'push_purchase_to_datalayer'); function push_purchase_to_datalayer($order_id) { $order = wc_get_order($order_id); $items = $order->get_items(); $products = []; foreach ($items as $item) { $product = $item->get_product(); $products[] = [ 'id' => $product->get_id(), 'name' => $product->get_name(), 'category' => wc_get_product_category_list($product->get_id()), 'price' => $product->get_price(), 'quantity' => $item->get_quantity() ]; } ?> <?php }
Implementing Enhanced E-commerce Tracking with Data Layer
Enhanced e-commerce tracking provides more detailed insights into the shopping behavior of users. To implement enhanced e-commerce tracking with the Data Layer, you need to configure Google Tag Manager and Google Analytics to recognize and use the data pushed to the Data Layer.
Configuring Google Tag Manager
- Create Tags for E-commerce Events:
- In GTM, create new tags for each event (product view, add-to-cart, and purchase).
- For each tag, choose
Tag Configuration > Google Analytics: GA4 Event. - Set the
Event Nameand configure the event parameters to match the data pushed to the Data Layer.
- Create Triggers for E-commerce Events:
- Create custom event triggers for each e-commerce event (
productView,addToCart, andpurchase). - Configure the triggers to fire when the corresponding Data Layer event is pushed.
- Create custom event triggers for each e-commerce event (
- Link Tags and Triggers:
- Link the created tags to their respective triggers to ensure that the tags fire when the events occur.
Configuring Google Analytics
- Enable Enhanced E-commerce:
- In your GA4 property, navigate to
Admin > Ecommerce Settings. - Enable enhanced e-commerce reporting.
- In your GA4 property, navigate to
- Verify Data Collection:
- Use the Google Tag Assistant and the GA4 DebugView to verify that the e-commerce events are being correctly tracked and sent to Google Analytics.
Conclusion
Implementing Google Analytics and Google Tag Manager with a robust Data Layer setup on your WordPress site, especially when using WooCommerce, is essential for capturing detailed insights into user behavior and optimizing your website’s performance. By leveraging plugins like Code Snippets and integrating custom Data Layer events, you can efficiently track key interactions such as form submissions, product views, add-to-cart actions, and purchases.
Key Takeaways:
- WordPress Challenges: While WordPress offers flexibility through plugins, careful selection and management are crucial to avoid compatibility issues, security risks, and performance impacts.
- Importance of Tracking: Accurate tracking and analytics are vital for understanding user behavior, optimizing content, and driving business success.
- Google Analytics & GTM: These tools provide powerful capabilities for tracking and analyzing website performance, with GTM simplifying the management of multiple tags.
- Data Layer Benefits: The Data Layer ensures consistent and accurate data collection, enabling advanced tracking scenarios and better decision-making.
By following the steps outlined in this guide, you can ensure the implementation of tracking codes and Data Layer events, leading to more precise data collection and insightful analysis. Continuous monitoring and optimization of your tracking setup will help you stay ahead in the competitive digital landscape, making data-driven decisions that enhance user experience and boost conversions. Don’t forget to seek professional help if necessary.
Related Topics
- Data Tagging Best Practices to Build an Analytics Strategy
- How data layer improves data capture and integration in marketing and analytics platforms?
- How to check if Google analytics tags are working Fine
- Understanding the basic 6 steps to track events and interactions with Google Tag Manager
- Implementing Cookies Opt-In for Data Privacy Compliance
FAQs
Why is tracking user behavior important for my WordPress site?
Tracking user behavior provides insights into how visitors interact with your site, what content they engage with, and where they drop off. This information helps you optimize your website, improve user experience, and make data-driven decisions to enhance marketing strategies and increase conversions.
What are the advantages of using Google Tag Manager on a WordPress site?
Google Tag Manager (GTM) simplifies the process of adding and managing tracking tags on your WordPress site. It allows you to implement multiple tags without modifying the site’s code, enabling faster deployment, easier maintenance, and reduced reliance on developers. GTM also provides a centralized platform for managing all your tags and tracking codes.
How does the Data Layer enhance tracking capabilities?
The Data Layer acts as a centralized repository for storing information about user interactions and page elements. It ensures consistent and accurate data collection across different tags and triggers. By using the Data Layer, you can implement more sophisticated tracking scenarios, such as custom events and e-commerce interactions, leading to better insights and improved decision-making.
Can I track form submissions on my WordPress site?
Yes, you can track form submissions on your WordPress site by setting up custom Data Layer events. For popular form plugins like Contact Form 7 and Gravity Forms, you can use JavaScript to push form submission events to the Data Layer. These events can then be tracked in Google Tag Manager and analyzed in Google Analytics.
What are the challenges of using plugins for tracking implementation on WordPress?
While plugins offer ease of use and quick implementation, they can also present challenges such as compatibility issues, security risks, and performance impacts. It’s crucial to carefully select and manage plugins to avoid conflicts and ensure your site remains secure and performant. Regular updates and maintenance are also essential to mitigate these risks.
How do I implement enhanced e-commerce tracking in WooCommerce?
To implement enhanced e-commerce tracking in WooCommerce, you need to set up the Data Layer to capture key e-commerce events such as product views, add-to-cart actions, and purchases. You then configure Google Tag Manager to use these Data Layer events and send the data to Google Analytics. This setup provides detailed insights into customer behavior and sales performance.