Your cart is currently empty!
How to Track a User Property in Google Analytics with GTM
- Understanding User Properties in Google Analytics
- How to Set User Properties
- Limitations of User Properties in Google Tag Manager
- FAQs
- What are user properties in Google Analytics?
- How do I set user properties in Google Tag Manager?
- How can I debug my user property implementation in Google Analytics?
- Why aren’t my user properties showing up in Google Analytics?
- Is it possible to set user properties in the default Google Tag in Google Tag Manager?
User properties in GA4 are essential for developing a thorough view of your audience. By tracking attributes such as user preferences, demographics, and engagement levels, businesses can customize their strategies to meet the specific needs and behaviors of their users. This article will explain how user properties work, how to implement them, and how to use them in Google Analytics. Through this guide, you will learn to leverage these insights to enhance your analytics and drive more informed decisions.
Understanding User Properties in Google Analytics
User properties in Google Analytics are customizable attributes associated with users that provide detailed insights into user behavior and characteristics. These properties go beyond the default metrics tracked by Google Analytics, allowing businesses to capture specific data points relevant to their operations and marketing strategies. By leveraging user properties, businesses can tailor their digital strategies to better meet the needs and preferences of their audience.
What Are User Properties?
User properties are predefined or custom attributes assigned to users visiting your website. These attributes enable a more granular analysis of user interactions and demographics, providing valuable insights that can drive more effective marketing and operational decisions. Here are some examples of user properties:
- Demographics:
- Age: Understand which age groups are most engaged with your content or products. For instance, an e-commerce platform can use age data to tailor product recommendations and marketing campaigns for different age groups.
- Gender: Analyze differences in behavior and preferences between male and female users. This can help online retailers customize their advertising strategies to appeal to different genders.
- Location: Identify geographic regions where your website is most popular and tailor local marketing efforts accordingly. A travel booking site, for example, can provide region-specific deals and promotions based on users’ locations.
- Language: Ensure your content is accessible and engaging to users in their preferred language, which is crucial for global websites to cater to diverse audiences.
- Behavioral Data:
- Frequency of Visits and Customer Retention: Track how often users return to your site, helping you identify loyal customers. A news website might use this data to offer subscription incentives to frequent readers.
- Purchase History: Monitor the purchasing behavior of users, including items bought, purchase frequency, and transaction value. An online retailer can leverage this data to create personalized discount offers and loyalty programs.
- Technological Information:
- Device Type: Determine whether users access your site via desktop, mobile, or tablet, and optimize the user experience accordingly. For example, knowing a significant portion of users are on mobile can lead to prioritizing mobile-friendly design.
- Operating System: Identify which operating systems are most commonly used, ensuring compatibility and performance.
- Browser Used: Analyze browser preferences to resolve compatibility issues and enhance user experience.
- Custom Data:
- Membership Status: Track whether users are members, non-members, or have different membership levels, and tailor content to their status. A streaming service might offer exclusive content or early access to premium members.
- Subscription Level: Understand the subscription tiers of your users, such as free, premium, or enterprise, to provide appropriate value propositions.
- User Preferences: Capture specific user preferences, such as favorite categories, preferred communication channels, or personalized settings. This can help a subscription service recommend new shows or products that align with individual tastes.
By implementing and analyzing user properties, businesses can gain a comprehensive understanding of their audience, leading to more personalized user experiences, targeted marketing strategies, and ultimately, higher engagement and conversion rates. For further reading on capturing and leveraging detailed user data, explore our guide on Data Layer Importance in Data Capture.
How to Set User Properties
Setting user properties in Google Analytics involves several steps, which can vary depending on the tools and methods you choose to use. Below are detailed guides for setting user properties using Google Tag Manager, configuring them as user-scoped custom dimensions in Google Analytics, and setting them in the Google Tag configuration for hardcoded tracking.
Setting User Properties in Google Tag Manager
- Create a Variable:
- Navigate to the Variables section in Google Tag Manager.
- Click on New and create a new variable that captures the user property (e.g., User ID, Membership Status).
- Configure the Variable:
- Select the appropriate variable type (e.g., Data Layer Variable, First Party Cookie).
- Enter the necessary details to capture the specific user property.
- Create a Trigger:
- Navigate to the Triggers section and create a new trigger that fires on the desired user action or page load.
- Set Up a Tag:
-
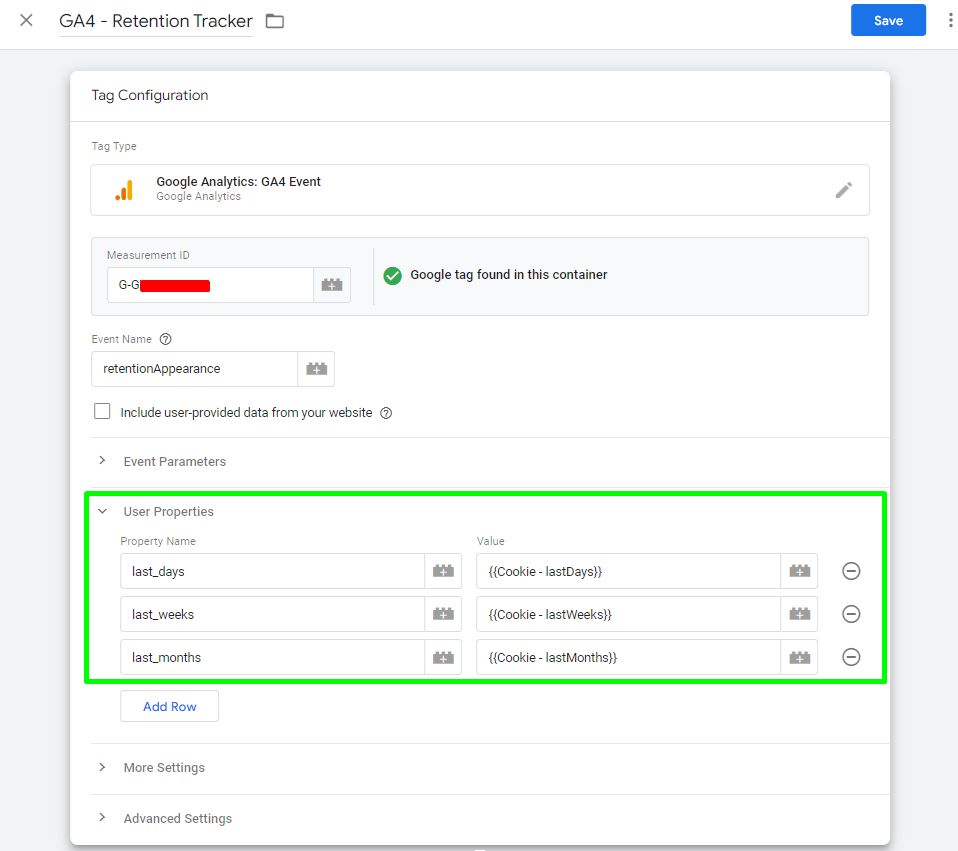
- In the Tags section, create a new tag (Google Analytics: GA4).
- Configure the tag to send the user property data to Google Analytics by defining the “User Properties”.
- Under Fields to Set, add the field name (e.g., &uid) and set its value to the variable you created.

-
- Test and Publish:
- Use the Preview mode to test the tag and ensure the user property is being correctly captured and sent.
- Once verified, publish the changes.
Setting User Properties in the Google Tag Configuration (gtag.js) for Hardcoded Tracking
- Identify the User Property:
- Determine the user property you want to track (e.g., User ID, Membership Status) and how you will capture it on your website.
- Modify the Tracking Code:
- Update your Google Analytics tracking code to include the user property. This typically involves modifying the
gtag.jsoranalytics.jssnippet.
- Update your Google Analytics tracking code to include the user property. This typically involves modifying the
- Set the User Property:
-
- In the
gtag.jssnippet, set the user property usinggtag('set', 'user_properties', {...}). For example:
- In the
gtag('set', 'user_properties', { 'user_id': 'USER_ID_VALUE', 'membership_status': 'MEMBER_STATUS_VALUE' });- In the
analytics.jssnippet, use thega('set', 'dimensionX', 'VALUE')method, replacingdimensionXwith the appropriate custom dimension index.
-
Verifying User Properties Implementation
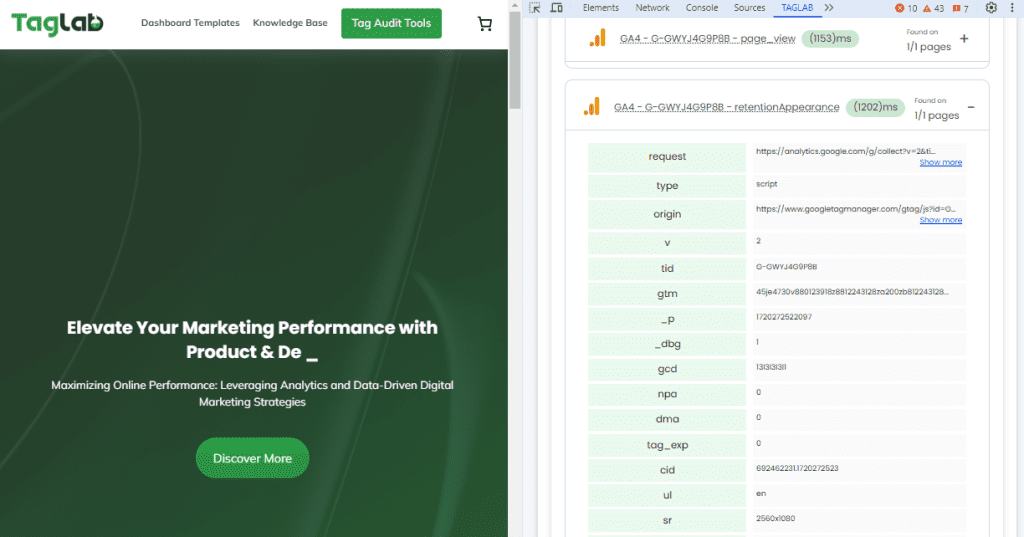
To ensure your user properties are accurately implemented and being sent to Google Analytics, you need to debug and validate the data. Here’s how you can do it for both Google Tag Manager (GTM) and hardcoded gtag.js code changes with TAGLAB’s Tag Debugging Extension available for Google Chrome or Microsoft Edge:
 Navigate Your Website:
- Open your website in the new debug window that appears.
- Perform the actions that should trigger the user properties to be sent.
- Inspect Tag Data:
- In the extension “Tags View” pane, find the relevant tag that should send user properties.
- Click on the tag to view details and inspect the data being sent.
- Ensure the user properties are correctly assigned. For instance:
- User properties should have key names prefixed with
up.(e.g.,up.last_days). Remeber that up.property_name refers to user properties while ep.property_names refers to event scoped properties.
- User properties should have key names prefixed with
 Verify Data Layer Variables for further troubleshooting in case of issues:
- Check the Data Layer tab in case you are relying on dataLayer variables to ensure the they are passing user properties as expected.
- Verify that the user properties are being pushed to the data layer with the correct values.
Configuring User-Scoped Custom Dimensions in Google Analytics
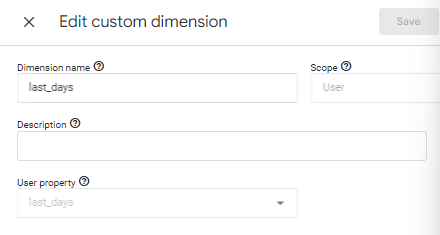
User properties sent to Google Analytics will not automatically appear in your reports. To view and utilize these properties, you need to configure them as user-scoped custom dimensions within the Custom Definitions section in Google Analytics. Here’s how to set this up:
- Log into Google Analytics:
- Access your Google Analytics account and navigate to the desired property.
- Go to Admin Settings:
- Click on the Admin tab in the bottom left corner.
- Navigate to Custom Definitions:
- In the Property column, click on Custom Definitions and then select Custom Dimensions.
- Create a New Custom Dimension:
- Click the + Create Custom Dimension button.
- Define the Custom Dimension:
- Name: Enter a descriptive name for the custom dimension (e.g., Membership Status).
- Set the Scope: Make sure to select “User” as a scope from the drop down menu
- User property: Input the exact user property name as you set it up in Google Tag Manager or in your gtag.js and save

For more details, read about Custom Dimensions in Google Analitics with Google Tag Manager and the Data Layer or about Custom Dimensions and Metrics in Google Analytics.
Limitations of User Properties in Google Tag Manager
In the default Google Tag configuration within Google Tag Manager (GTM), setting user properties directly is not possible. Instead, it is essential to define user properties through another event. Here’s a breakdown:
Defining User Properties with a Custom Event Creation:
-
- You need to create a custom event in GTM to capture and send user properties.
- This custom event will act as the vehicle to carry user property data to Google Analytics.
Shared Properties Across Event Tags & Other Considerations
While direct user property configuration in the default Google Tag is not feasible, you can set shared properties to be used across all other event tags. However, these properties will be scoped to events, not users.
- Ensure that the scope of these properties in GTM/gtag.js aligns with the scope in Google Analytics 4 (GA4).
- Misalignment between the event scope in GTM and the user scope in GA4 will result in the properties not being tracked correctly.
FAQs
What are user properties in Google Analytics?
User properties in Google Analytics are customizable attributes that provide detailed insights into user behavior and characteristics. These properties allow businesses to capture specific data points beyond the default metrics, such as demographics, behavioral data, technological information, and custom data relevant to their operations and marketing strategies.
How do I set user properties in Google Tag Manager?
To set user properties in Google Tag Manager, you need to create a custom event and include the user properties within that event. This involves configuring the tag to send the custom event along with the specified user properties to Google Analytics.
How can I debug my user property implementation in Google Analytics?
To debug your user property implementation, inspect the tag data variables in Google Tag Manager or in the gtag.js code. Ensure that the user properties are being passed correctly. Event properties will have key names prefixed with “ep.” (e.g., ep.property_name), while user properties will have key names prefixed with “up.” (e.g., up.property_name).
Why aren’t my user properties showing up in Google Analytics?
User properties will not be displayed in Google Analytics until they are configured as user-scoped custom dimensions in the Custom Definitions section. Make sure you have defined and activated these custom dimensions to view the data in your reports.
Is it possible to set user properties in the default Google Tag in Google Tag Manager?
No, setting user properties directly in the default Google Tag configuration in GTM is not possible. You must define user properties through another event. However, you can set shared properties across all event tags, but these will be event-scoped and not user-scoped. Ensure that the scopes are correctly aligned between GTM/gtag.js and GA4 to avoid tracking issues.


